Localization should happen in your own application, there is nothing included in cloudscribe.Web.Navigation to localize menus, and nothing is needed there to achieve it. After all, your menu is custom to your needs. I have added localization to the NavigationDemo.Web project in our github repository to show you how it is done. The demo even has a language selector dropdown, and I have translated the English menu items into 7 different languages using google translate.
The way to implement localization in ASP.NET Core in general is using IStringLocalizer of T, as seen in the localization documentation for ASP.NET Core.
The place where localization of the menu should happen is in the views where you have control over it. We provide embedded views in cloudscribe.Web.Navigation, but you can copy any of the views you are actually using to the local files of your application. Views/Shared/Components/Navigation is the main folder where component views go. Those views sometimes invoke child partial views which may live higher up in Views/Shared.
I would suggest only copy the views locally if you are actually using them and need to customize them. You can see that I copied some of them into the NavigationDemo.Web Views. To localize a view, you do need to copy it locally so you can modify it.
UPDATE 2019-03-05
The latest version now has localization built into the views that are in the nuget packages. If you use cloudscribe.Web.Localization then you only need to create the MenuResources-langcode.resx files and add your menu keys. However, if you don't use cloudscribe.Web.Navigation then you still have to localize it in local views and using your own empty class for the IStringLocalizer.
First Steps Add Localization to the Application
There are 2 main packages you should add to dependencies in your .csproj file
<PackageReference Include="Microsoft.Extensions.Localization" Version="1.1.*" />
<PackageReference Include="Microsoft.AspNetCore.Mvc.Localization" Version="1.1.*" />
Then in Startup.cs in the ConfigureServices method, you need to configure a few things including the list of languages/cultures that you want to support and which is the default culture:
services.AddLocalization(options => options.ResourcesPath = "Resources");

services.AddMvc()
.AddViewLocalization(LanguageViewLocationExpanderFormat.Suffix)
.AddDataAnnotationsLocalization()
.AddRazorOptions(options =>
{
	options.AddEmbeddedViewsForNavigation();
});

services.Configure<RequestLocalizationOptions>(options =>
{
	var supportedCultures = new[]
	{
		 new CultureInfo("en-US"),
		 new CultureInfo("es-ES"),
		 new CultureInfo("fr-FR"),
		 new CultureInfo("de-DE"),
		 new CultureInfo("hi-IN"),
		 new CultureInfo("ru-RU"),
		 new CultureInfo("zh-Hans"),
		 new CultureInfo("zh-Hant"),
	};

	options.DefaultRequestCulture = new RequestCulture(culture: "en-US", uiCulture: "en-US");
	options.SupportedCultures = supportedCultures;
	options.SupportedUICultures = supportedCultures;

});
Then in the Configure method you need to wire up the localization middleware like this:
var locOptions = app.ApplicationServices.GetService<IOptions<RequestLocalizationOptions>>();
app.UseRequestLocalization(locOptions.Value);
Creating the Localization Resources
Note that "Resources" is what we configured for the folder name in the ConfigureServices code above, it doesn't have to be named that.
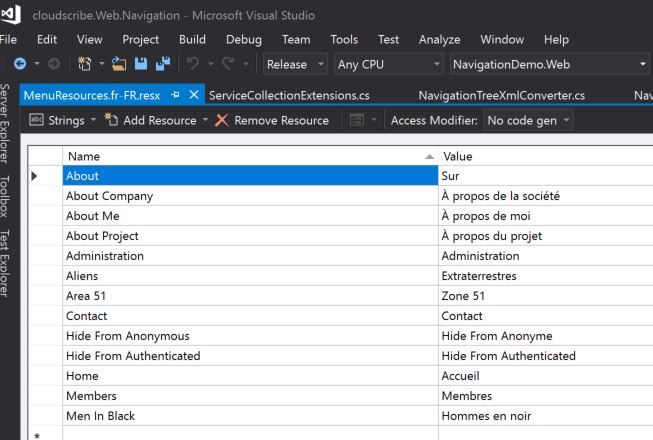
Next you create the actual Resources folder in your web application and that is where you will put resx files. The resx files will be named according to the T in the IStringLocalizer of T. T stands for Type and in order to get and IStringLocalizer we need to create a class that will serve as the T and it is what our regx files will be named from. It can be an empty public class, in the demo I created an empty class named MenuResources, in the root folder of the web app.
So now that we have the folder and the class, it is just a matter of creating the resx files. Note that in this resource model there is no default resx file and no .designer.cs file like you may have seen in other scenarios. We only create language specific files and the default language is the text we pass into the IStringLocalizer. Unlike the other resx model which has a default resx file and a .designer.cs file, the key in our translated files allows white space since we can pass any arbitrary text into IStringLocalizer.
You can see in the demo app, I have added the following resx files:
MenuResources.de-DE.resx
MenuResources.es-ES.resx
MenuResources.fr-FR.resx
MenuResources.hi-IN.resx
MenuResources.ru-RU.resx
MenuResources.zh-Hans.resx
MenuResources.zh-Hant.resx
When I say there is no default resx file in this model, what I mean is there is no resx file that is not language specific, ie there is no MenuResources.resx and no MenuResources.Resx,designer.cs. When you have a default resx file and the .designer.cs file, that model does not allow spaces in the keys. That is a completely different model, in the model we are using, our resx files all have a language code suffix in the file name, and the keys allow white space and correspond to any string that you need to translate. In Visual Studio, you see our resx files are set with the Access Modifier: "No code gen".
Localize the Views by injecting the IStringLocalizer
The final step is to inject our IStringLocalizer into the views and then pass any menu item text into the localizer. Here you can see the customized bootstrapbreadcrumbs.cshtml from our demo app.
@using cloudscribe.Web.Navigation
@using Microsoft.Extensions.Localization
@model NavigationViewModel
@inject  IStringLocalizer<NavigationDemo.Web.MenuResources> localizer
@if (Model.CurrentNode != null && Model.ParentChain.Count > 1)
{
    <ul class="breadcrumb">
    @foreach (var node in Model.ParentChain)
    {
        if (!Model.ShouldAllowView(node)) { continue; }
        if (node.EqualsNode(Model.CurrentNode))
        {
            if (Model.TailCrumbs != null)
            {
                <li><a href="@Url.Content(Model.AdjustUrl(node))">@localizer[Model.AdjustText(node)]</a><span class="divider"></span></li>
            }
            else
            {
                <li class="active">@localizer[Model.AdjustText(node)]</li>
            }
        }
        else
        {
            <li><a href="@Url.Content(Model.AdjustUrl(node))">@localizer[Model.AdjustText(node)]</a><span class="divider"></span></li>
        }
    }
    @if (Model.TailCrumbs != null)
    {
        foreach (var n in Model.TailCrumbs)
        {
            <li class="active">@localizer[n.Text]</li>
        }
    }
    </ul>
}
Notice how all the places where we render the menu text, we pass that into @localizer[] and out comes either a translated string for the current culture if we have a translation, or if not, we get back the same text that is passed in. So you just add keys with whatever strings you are using into your resx files with their corresponding translations. If the resx file exists for the language but the key is missing, you get the input string as output.
As noted in the ASP.NET Core localization documentation, the localization middleware can set the current culture of the request based on the preferred language setting of the web browser, by a cookie, or by a request parameter, or using a custom provider that you create yourself. Once the middleware has set the culture on the thread for the request, that is what determines what resx file it will use. It will try to find one for the current culture. If none is found, or if the string is not found as a key in the resx file, you just get back the untranslated string that was passed in to IStringLocalizer.