The new webpack options in the cloudscribe Project template requires some additional tooling including NodeJs and Npm. If you don't already know about our project template, please see the introduction.
Visual Studio Setup on Windows
Make sure your installation of Visual Studio 2017 is up to date. You can run the Visual Studio installer to check for updates. At the time of this writing my installation says version 15.4.1 under Help > About
You need to install NodeJs and Npm, you can can get the latest LTS version from their website. The windows installer for Node will install both Node and Npm.
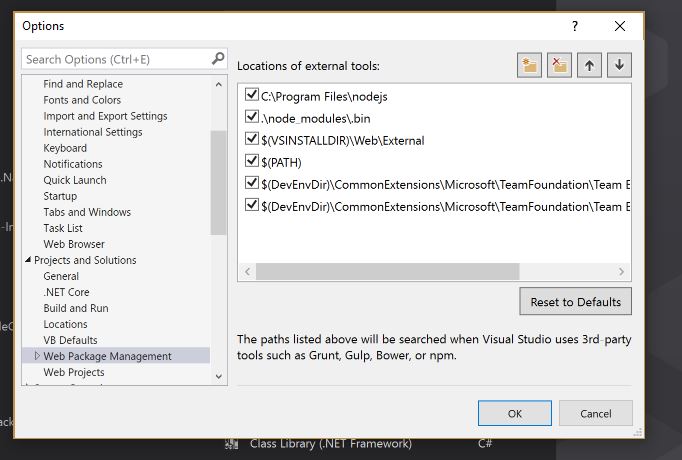
Visual Studio actually ships with an older version of Node, but you need to configure Visual Studio to use the newer version you installed. Look under Tools > Options > Projects and Solutions > Web Package Management > External Tools You can add the path there for your newer installation of Node and move it to the top of the list as shown, ie c:\Program Files\nodejs
You should also install the Npm Task Runner extension for Visual Studio which lets you run npm tasks manually from Task Runner Explorer in Visual Studio.
Npm is Node Package Manager, it can restore the needed javascript dependencies which are listed in the package.json file in the root of the web application. In addition to dependencies, the package.json file also supports a scripts section which allows you to define commands and then you can run those commands from Task Runner Explorer in Visual Studio if you install the extension mentioned above.
The cloudscribe webpack setup has 2 commands build and build-production which are commands that run webpack against our webpack,config.js file and against our webpack.production.config.js file.
The .csproj file of the webapp also has settings to make the tasks run automatically during build and publishing. This is why the build will fail if you don't have Node and Npm installed and setup as described above.
If everything is installed and setup correctly, then the npm packages should get restored automatically when you first build the solution. If it fails, you can right click the Npm node under Dependencies in the web app and choose "Restore Packages". If that doesn't work for you you can try opening a command window in the root of the web app, and run the command npm install from the command window. If that doesn't work then something must have gone wrong with your installation, try a reboot.
Command Line Setup on Ubuntu Linux
I'm using Ubuntu Linux 16.04 and I first installed the .NET Core SDK using the instructions for Ubuntu.
Next I opened a terminal and used these commands to install node and npm:
sudo apt-get update
sudo apt-get install nodejs
sudo apt-get install npm
On my machine the node command was not found after installing but I found it could be solved by this command:
sudo ln -s /usr/bin/nodejs /usr/bin/node
After doing that I ran the command node --version, and it reported version 4.2.6
If you haven't already, now is a good time to install the cloudscribe Project Template like this:
dotnet new -i "cloudscribe.templates::*"
See the introduction for details about using the project template to create projects. The main thing to know is that there are new options -W true will include the webpack setup when creating a project and -R true will include a sample react/redux app.
After creating your web app project with the cloudscribe template, you run these commands:
npm install
dotnet build
dotnet run
npm install is needed just once unless you add more package dependencies in package.json
dotnet build should also restore packages. You can also use dotnet restore --no-cache to manually restore packages
Note that you can use the command line on windows as well, the instructions are the same except for the installation.
Troubleshooting
If you get an error about node-sass, try the command: npm rebuild node-sass
You may also want to try installing webpack globally: npm install -g webpack